Cycling has undergone a training revolution since the advent of heart rate monitoring in the 1970s. No longer relying solely on perceived exertion, cyclists can now gain precise insights into their physiological response to exercise.
Using heart rate data, you can:
- Train smarter: Target specific fitness goals by training within precise heart rate zones, optimizing your efforts for endurance, power, or speed.
- Prevent overtraining: Monitor training stress and adjust your workload to maximize recovery and minimize the risk of injury.
- Track progress: Continuously monitor your performance, identify areas for improvement, and celebrate your achievements.
- Unlock peak performance: Optimize your training intensity and duration for maximum gains in speed, endurance, and overall cycling performance.
The Darefore sensor takes heart rate monitoring to the next level. By seamlessly integrating real-time position data with accurate heart rate information, it provides a comprehensive view of your performance. This allows you to analyze your training in unprecedented detail, make data-driven decisions, and ultimately achieve your cycling goals more effectively.”
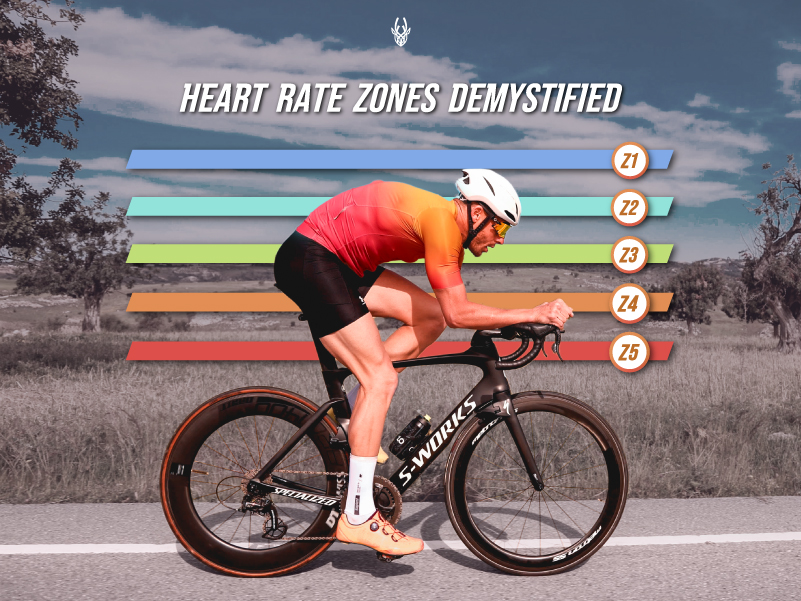
Understanding Heart Rate Zones
Heart rate zones are a valuable tool for cyclists to gauge training intensity and tailor workouts for specific goals. By dividing your heart rate range into distinct zones, you can effectively target different physiological systems.
Common Heart Rate Zones:
- Zone 1 (Recovery): Very light effort, easily maintain a conversation. Ideal for active recovery and easy rides.
- Zone 2 (Endurance): Sustained aerobic training, comfortable conversation with slightly more effort. Builds a strong aerobic base.
- Zone 3 (Tempo): Moderate intensity, conversation becomes more challenging. Improves lactate threshold.
- Zone 4 (Threshold): High intensity, difficult to maintain a conversation. Improves lactate threshold (LT) – the point where lactate buildup exceeds clearance.
- Zone 5 (Anaerobic): Highest intensity, short duration efforts. Improves anaerobic capacity.
Determining Your Heart Rate Zones
Several methods can be used to determine your individual heart rate zones:
1. Percentage of Maximum Heart Rate (MHR)
If you do not know already you MHR, the most common way to estimate your maximum heart rate (HRmax) is by using the following formula:
- 220 – Age = Estimated HRmax
Example: If you are 40 years old: 220 – 40 = 180 beats per minute (bpm)
Next, lets see how we can determine your heart rate zones using the Percentage of Maximum Heart Rate (MHR) method:
Calculate the heart rate range for each zone:
- Zone 1 (Recovery): 50-60% of MHR
- Zone 2 (Endurance): 60-70% of MHR
- Zone 3 (Tempo): 70-80% of MHR
- Zone 4 (Threshold): 80-90% of MHR
- Zone 5 (Anaerobic): 90-100% of MHR
Example:
If your estimated MHR is 180 bpm:
- Zone 1: 90-108 bpm
- Zone 2: 108-126 bpm
- Zone 3: 126-144 bpm
- Zone 4: 144-162 bpm
- Zone 5: 162-180 bpm
2. Heart Rate Reserve (HRR)
Considers resting heart rate for a more personalized approach.
To calculate HRR you subtract your resting heart rate from your Maximum Heart Rate (MHR).
For example, if your MHR is 180 bpm and your resting heart rate is 60 bpm, your HRR is 120 bpm (180 – 60 = 120).
Determine Zone Percentages:
- Calculate the percentage of your HRR for each zone.
- Then, add your resting heart rate back to these values to find the target heart rate range for each zone.
Example (using the same MHR and resting heart rate):
- Zone 1: 50-60% of HRR = 60-72 bpm
- Add resting heart rate: 60-72 bpm + 60 bpm = 120-132 bpm
- Zone 2: 60-70% of HRR = 72-84 bpm
- Add resting heart rate: 72-84 bpm + 60 bpm = 132-144 bpm
And so on for the remaining zones.
- Add resting heart rate: 72-84 bpm + 60 bpm = 132-144 bpm
Benefits of HRR:
- More Personalized: Accounts for individual variations in resting heart rate.
- More Accurate for Some: Can be more accurate than the simple MHR percentage method for some individuals.
3. Lactate Threshold Test (LT Test):
This involves performing an incremental exercise test while measuring blood lactate levels. The LT is the intensity at which lactate begins to accumulate in the blood faster than it can be cleared. This is considered the most accurate method for determining training zones.
Determining Zones:
- The heart rate at the lactate threshold is used to define the upper limit of Zone 4.
- Zones 1-3 are then determined relative to the LT heart rate.
Example:
Let’s say an athlete’s lactate threshold occurs at a heart rate of 170 beats per minute (bpm).
- Zone 4 would typically range from a lower limit (e.g., 165 bpm) up to the LT heart rate of 170 bpm.
- Zone 3 would fall below Zone 4, perhaps ranging from 155-165 bpm.
- Zones 1 and 2 would then be determined accordingly, with Zone 1 being the lowest intensity and Zone 2 falling between Zone 1 and Zone 3.
Why it’s the Most Accurate:
- Directly measures the physiological response (lactate accumulation) to exercise intensity.
- Provides a highly personalized and accurate assessment of training zones.
Note: LT tests are typically conducted in a laboratory setting and require specialized equipment and expertise.
By understanding and utilizing heart rate zones, you can tailor your training to achieve specific fitness goals and maximize your cycling performance.

Using Heart Rate for Training
Now that you understand heart rate zones, let’s explore how to effectively use them in your cycling training:
1. Endurance Training (Zone 2):
Focus: Build a strong aerobic base, increase endurance, and improve fat burning.
Characteristics:
Sustained effort over extended periods.
Comfortable conversation is possible.
Ideal for long rides, recovery rides, and base-building phases.
Example: A 2-hour ride at a conversational pace, maintaining a heart rate within Zone 2.
Now that you understand heart rate zones, let’s explore how to effectively use them in your cycling training:
Zone 2 Training: The Foundation of Endurance
Zone 2 training is the cornerstone of any successful cycling program, particularly for endurance cyclists. It’s characterized by a sustained, comfortably hard effort where you can still hold a conversation, albeit with slightly more effort than in Zone 1 (recovery).
Key Benefits
Builds a Strong Aerobic Base:
- Improves the efficiency of your body’s oxygen utilization.
- Increases the number and size of mitochondria (the “powerhouses” of your cells) responsible for energy production.
- Enhances the delivery of oxygen to working muscles.
Increases Fat Burning:
- Trains your body to utilize fat as a primary fuel source, sparing glycogen stores for more intense efforts.
- This is crucial for long-distance rides and endurance events.
Reduces Risk of Injury:
- Low-impact nature minimizes the risk of overuse injuries.
- Improves overall cardiovascular health.
Mental Toughness:
- Develops mental endurance and the ability to sustain effort over extended periods.
Enjoyable Rides:
- Zone 2 training can be a very enjoyable way to spend time on the bike, allowing you to explore new routes and enjoy the scenery.
Training Characteristics
Duration: Typically 60-120 minutes or longer.
Intensity:
- Heart rate within Zone 2 (typically 60-70% of MHR or 60-75% of FTP).
- Comfortable but sustained effort, slightly harder than a casual ride.
- Breathing should be steady and rhythmic.
Training Examples
- Long, Steady Rides: 2-3 hour rides at a consistent Zone 2 pace.
- Recovery Rides: Easy rides following hard workouts or races to aid in muscle recovery.
- Base Building Rides: Long rides (3+ hours) performed consistently throughout the base training phase.
Tips for Effective Zone 2 Training:
- Maintain Consistency: Include 2-3 Zone 2 rides per week in your training schedule.
- Vary Terrain: Incorporate gentle rolling hills or slight inclines to add variety and challenge.
- Listen to Your Body: Adjust your pace as needed based on how you feel.
- Stay Hydrated and Fueled: Consume adequate fluids and electrolytes, especially on longer rides.
In Summary
Zone 2 training is a foundational element of any successful cycling program. By consistently incorporating Zone 2 rides into your training schedule, you’ll build a strong aerobic base, improve endurance, and lay the groundwork for faster and more powerful rides

Zone 3 Training: The “Sweet Spot” for Endurance
Zone 3 training, often referred to as “tempo” or “sweet spot” training, sits between the steady grind of Zone 2 and the all-out intensity of Zone 4. It’s a challenging yet sustainable effort where you’ll feel a noticeable increase in breathing and heart rate.
Key Benefits
Lactate Threshold Improvement:
- The primary focus of Zone 3 is to increase your lactate threshold (LT).
- This is crucial because it allows you to sustain a higher intensity for longer durations before lactate buildup significantly impacts performance.
Enhanced Aerobic Efficiency:
- Further improves your body’s ability to utilize oxygen efficiently.
- Increases the capacity to transport and utilize oxygen in working muscles.
Improved Endurance:
- Builds muscular endurance and allows you to sustain higher intensities for longer periods.
Race Pace Simulation:
- For many cyclists, Zone 3 effort closely resembles race pace, making it excellent preparation for competitive events.
Training Characteristics
- Intensity:
- Heart rate within Zone 3 (typically 70-80% of MHR or 75-85% of FTP).
- Conversation becomes more challenging, but still possible in short phrases.
- Breathing becomes more labored.
- Duration:
- Typically 20-60 minutes of sustained effort.
- Can be incorporated into longer rides as intervals or sustained efforts.
Training Examples
- Tempo Rides: 45-60 minute rides at a consistent Zone 3 effort.
- Tempo Intervals: 20-30 minute intervals at Zone 3 with short recovery periods in Zone 2.
- Long Tempo Rides: 1.5-2 hour rides with extended periods in Zone 3 interspersed with easier sections.
Tips for Effective Zone 3 Training
- Progressive Overload: Gradually increase the duration and intensity of Zone 3 efforts over time.
- Listen to Your Body: Pay close attention to how you feel. If you’re feeling overly fatigued or experiencing discomfort, reduce the intensity or stop the ride.
- Hydration and Nutrition: Ensure adequate hydration and fuel intake during and after Zone 3 workouts.
- Recovery: Allow for adequate recovery between Zone 3 training sessions to prevent overtraining.
In Summary
Zone 3 training is a crucial component of a well-rounded cycling program. By incorporating regular Zone 3 efforts, you can significantly improve your lactate threshold, enhance your endurance, and increase your overall cycling performance.
Zone 4 Training: Pushing Your Limits
Zone 4 training, often referred to as “threshold” or “lactate threshold” training, is a high-intensity effort where you’re operating close to your lactate threshold. This means you’re working hard, but you can still sustain the effort for a moderate duration before fatigue starts to significantly impact performance.
Key Benefits
Lactate Threshold Improvement:
- The primary focus of Zone 4 training is to significantly increase your lactate threshold (LT).
- This translates to the ability to sustain a higher pace for longer durations in races.
Increased Power Output:
- Improves your ability to generate power at a sustained high intensity.
Enhanced Mental Fortitude:
- Develops mental toughness and the ability to push through discomfort and fatigue.
Training Characteristics
- Intensity:
- Heart rate within Zone 4 (typically 80-90% of MHR or 90-105% of FTP).
- Conversation is difficult, often limited to short, infrequent phrases.
- Breathing is heavy and labored.
- You’ll feel a significant burning sensation in the muscles.
- Duration:
- Typically 3-20 minutes per interval.
- Total training time can vary depending on the number and duration of intervals.
Training Examples
- Threshold Intervals:
- 4 x 5-minute intervals at Zone 4 with 3-5 minutes of active recovery in Zone 2 between each interval.
- Lactate Threshold Tests:
- Longer efforts (20-40 minutes) at or slightly above lactate threshold to assess and improve your LT.
- Over-Unders:
- Alternating between short bursts of high-intensity effort (Zone 4) and periods of slightly reduced effort (Zone 3).
Tips for Effective Zone 4 Training
- Proper Warm-up: A thorough warm-up is crucial to prepare your body for the high-intensity effort.
- Focus on Technique: Maintain good form and efficient pedaling technique throughout the intervals.
- Recovery: Allow for adequate recovery between intervals and between Zone 4 training sessions.
- Listen to Your Body: Do not push yourself too hard, especially when starting. Gradually increase the duration and intensity of Zone 4 efforts as you adapt.
In Summary
Zone 4 training is a challenging but highly effective way to improve your lactate threshold, increase your power output, and enhance your overall cycling performance. However, it’s crucial to approach Zone 4 training with caution and prioritize proper recovery to avoid overtraining and injury.
Important Note: Zone 4 training should be performed with careful consideration and should only be included in your training program once you have a solid aerobic base built from consistent Zone 2 training.

Zone 5 Training: All-Out Effort
Zone 5 represents the highest intensity of exercise, pushing your physiological limits. This zone is characterized by all-out efforts, often referred to as “VO2 max” intervals.
Key Benefits
VO2 Max Improvement:
- Significantly increases your VO2 max, the maximum amount of oxygen your body can utilize during exercise.
- This is a key determinant of aerobic capacity and performance in high-intensity events.
Anaerobic Capacity Enhancement:
- Improves your body’s ability to produce energy without the use of oxygen (anaerobic metabolism).
Explosive Power Development:
- Increases your ability to generate explosive power, crucial for sprints and accelerations.
Training Characteristics
- Intensity:
- Heart rate within Zone 5 (typically 90-100% of MHR or 106-120% of FTP).
- All-out effort, unsustainable for more than a few minutes.
- Breathing is extremely labored, and you’ll feel severe muscle burning.
- Duration:
- Very short intervals, typically 30 seconds to 5 minutes.
- Recovery periods are crucial and should be longer than the work intervals (e.g., 3-5 minutes of easy spinning in Zone 1 or 2).
Training Examples
- VO2 Max Intervals:
- 6 x 1-minute intervals at maximum effort with 3-5 minutes of recovery between each interval.
- Hill Repeats:
- Short, steep hill climbs at maximum effort followed by easy descents for recovery.
- Sprint Intervals:
- Short, explosive sprints on flat ground or on a wind trainer.
Tips for Effective Zone 5 Training
- Proper Warm-up: A thorough warm-up is crucial to prepare your body for the intense effort.
- Focus on Technique: Maintain good form and efficient pedaling technique throughout the intervals.
- Adequate Recovery: Allow for ample recovery between intervals and between Zone 5 training sessions.
- Limited Volume: Zone 5 training should be performed sparingly due to its high intensity.
- Prioritize Safety: Never compromise safety. If you feel dizzy or lightheaded, stop the interval immediately.
In Summary
Zone 5 training is extremely demanding and should only be included in your training program once you have a strong foundation of base fitness. It’s crucial to approach Zone 5 training with caution, prioritize proper recovery, and listen to your body carefully.
By incorporating short, high-intensity Zone 5 intervals into your training plan, you can significantly improve your VO2 max, develop explosive power, and enhance your performance in high-intensity cycling events.

Zone 1 Training: Active Recovery and Base Building
Zone 1 training is the foundation of any successful cycling program. It’s characterized by very light effort, where you can easily hold a conversation without any strain.
Key Benefits
Active Recovery:
- Aids in muscle recovery after intense workouts or races.
- Promotes blood flow to muscles, helping to remove metabolic waste products.
- Reduces muscle soreness and improves overall recovery.
Improved Circulation:
- Enhances blood flow throughout the body, improving cardiovascular health.
Stress Reduction:
- Provides a low-stress environment for physical and mental rejuvenation.
Base Building:
- While primarily for recovery, consistent Zone 1 training can contribute to a gradual increase in aerobic fitness over time.
Mental and Emotional Benefits:
- Offers an opportunity to enjoy the outdoors, clear your mind, and simply enjoy the act of cycling.
Training Characteristics
Intensity:
- Very low intensity, heart rate within Zone 1 (typically 50-60% of MHR or 50-55% of FTP).
- Feel completely relaxed and comfortable.
- Breathing should be easy and effortless.
Duration:
- Can range from 30 minutes to 2 hours or more.
Training Examples:
- Easy Recovery Rides: Short, leisurely rides following hard workouts or races.
- Long, Slow Distance Rides: Longer rides at a very easy pace, often used for active recovery or as part of a long base-building phase.
- Warm-up and Cool-down: Used as a warm-up before more intense workouts and as a cool-down after training sessions.
Tips for Effective Zone 1 Training
- Consistency: Include regular Zone 1 rides in your training schedule, especially after hard workouts or races.
- Enjoy the Ride: Use these rides as an opportunity to relax, explore new routes, and simply enjoy the cycling experience.
- Listen to Your Body: If you start to feel any discomfort, reduce the intensity or stop the ride.
In Summary
Zone 1 training is often overlooked, but it’s a crucial component of a well-rounded cycling program. By incorporating regular Zone 1 rides, you can enhance recovery, improve overall health, and ensure that you’re well-prepared for more intense training sessions.
Integrating Darefore with Heart Rate Training
Darefore’s unique position tracking technology, when combined with heart rate data, provides a powerful tool for cyclists to gain deeper insights into their performance and optimize their training.
Understanding Training Stress
Beyond Heart Rate: While heart rate provides valuable information about training intensity, it doesn’t always tell the whole story. Position data adds another layer of understanding. For example, a high heart rate on a flat section might indicate inefficiency, while the same heart rate on a steep climb is expected.
Identifying Inefficiencies: By analyzing position data alongside heart rate, cyclists can identify areas where they might be expending more energy than necessary. For example, excessive upper body movement or inefficient pedaling technique can increase heart rate without a proportional increase in power output.
Quantifying Aerodynamic Drag: By tracking body position, Darefore can help estimate aerodynamic drag. Combining this with heart rate data can provide insights into how body position affects energy expenditure and identify areas for improvement in aerodynamics.
Optimizing Training Plans
Personalized Feedback: The combined data can provide personalized feedback on training sessions, highlighting areas of strength and weakness. This allows cyclists to adjust their training plans to address specific areas for improvement.
Identifying Training Gaps: By analyzing trends in heart rate and position data over time, cyclists can identify areas where they may be undertraining or overtraining.
Predictive Analytics: The integrated data can be used to develop predictive models that can help anticipate performance and identify potential areas of concern before they become significant issues.
Darefore App and Data Visualization
Comprehensive Analysis: The Darefore Hub and app provides a user-friendly interface for visualizing and analyzing heart rate data alongside other performance metrics, including position data, power output, and speed.
Data-Driven Insights: The app can generate reports and visualizations that provide actionable insights into training performance, allowing cyclists to track progress, identify areas for improvement, and make data-driven decisions to optimize their training.
Integration with Other Platforms: Darefore can integrate with other popular cycling platforms and apps, allowing cyclists to consolidate their training data in one place and gain a more comprehensive view of their performance.
In Summary
By combining its unique position tracking technology with heart rate data, Darefore provides cyclists with a powerful tool for optimizing their training and achieving their performance goals. The integrated data provides deeper insights into training stress, identifies areas for improvement, and empowers cyclists to make data-driven decisions to enhance their performance on and off the bike.
Sample Training Plan
This is a sample training plan and should be considered a general guideline. Individual needs and fitness levels vary greatly. Consult with a certified cycling coach or sports medicine professional to create a personalized training plan that meets your specific goals and addresses your individual needs and limitations.
Week 1 (Beginner/Intermediate Level)
Monday:
- Rest or Active Recovery (Zone 1): 30-45 minutes easy spin in Comfortable position.
- Focus on light pedaling, enjoying the ride, and allowing muscles to recover.
- Maintain a heart rate within Zone 1 (50-60% of MHR).
Tuesday:
- Endurance Ride (Zone 2): 60-90 minutes at a comfortable pace in Comfortable position.
- Maintain a steady effort, allowing for conversation.
- Heart rate should remain within Zone 2 (60-70% of MHR).
- Explore new routes or enjoy scenic areas.
Wednesday:
- Rest or Cross-Training:
- Active recovery activities like swimming, running, or strength training can help improve overall fitness and prevent overuse injuries.
Thursday:
- Tempo Ride (Zone 3): 45 minutes at a moderately hard effort with the following:
- 20 minutes in Comfortable position, gradually increasing intensity to Zone 3.
- 15 minutes in Aggressive position, maintaining Zone 3 effort, focusing on smooth pedaling and efficient aerodynamics.
- 10 minutes in Comfortable position to recover slightly.
Friday:
- Rest or Active Recovery (Zone 1): 30 minutes easy spin in Comfortable position.
- Focus on light pedaling and allowing the body to fully recover from the previous day’s effort.
Saturday:
- Long Ride (Zone 2 with intervals in Zone 3): 2-3 hours with 3 x 15-minute intervals in Zone 3.
- Maintain a steady Zone 2 effort for the majority of the ride in Comfortable position.
- During the 15-minute intervals:
- First 5 minutes: Comfortable position, gradually increasing intensity to Zone 3.
- Next 10 minutes: Aggressive position, maintaining Zone 3 effort, focusing on smooth pedaling and efficient aerodynamics.
- Include 5-7 minutes of active recovery in Comfortable position between intervals.
Sunday:
- TT Simulation:
- 10-15 minutes warm-up in Comfortable position, gradually increasing intensity to Zone 2.
- 20-minute effort in TT position maintaining a consistent Zone 4 effort. (This can be done on a flat, straight section of road or on a trainer.)
- 10-15 minutes cool-down in Comfortable position, gradually reducing intensity to Zone 1.
Key Considerations
Position Focus:
- Comfortable: Relaxed upright position, ideal for long rides, recovery, and base building.
- Aggressive: Slightly more aerodynamic, with a slight forward lean and hands on the drops. Suitable for most road riding scenarios.
- Standing: Used for short bursts of power on climbs, accelerating, or overcoming obstacles.
- TT: Time Trial position, highly aerodynamic but demanding. Suitable for time trials, triathlons, and flat, fast sections of road rides.
Gradual Progression: Gradually increase the duration and intensity of workouts in each position to avoid discomfort and injury.
Listen to Your Body: Adjust your position and intensity based on how you feel.
Experiment: Experiment with different positions to find what works best for you and your bike.
Disclaimer: This is a sample training plan for informational purposes only and should not be considered professional advice. Consult with a certified cycling coach or a sports medicine professional to create a personalized training plan that meets your individual needs and goals.

Conclusion
By effectively utilizing heart rate zones and incorporating different riding positions into your training, you can unlock significant improvements in your cycling performance. Remember that consistency, progressive overload, and proper recovery are key to achieving your goals.
Key Takeaways:
- Heart rate zones provide a valuable framework for tailoring your training intensity and targeting specific fitness adaptations.
- Incorporating different riding positions such as Comfortable, Aggressive, and TT can enhance your aerodynamics and overall efficiency.
- Consistent training within and across different heart rate zones is crucial for building a strong foundation and achieving sustainable improvements.
- Proper recovery is essential to prevent overtraining and ensure optimal adaptation to training stress.
This training plan serves as a general guideline. Individual needs and fitness levels vary greatly. Always prioritize safety, listen to your body, and consult with a qualified cycling coach or sports medicine professional to create a personalized training plan that aligns with your specific goals and limitations.
Remember, cycling is a journey of continuous learning and adaptation. Embrace the process, enjoy the ride, and celebrate your progress!